Advanced Usage
In this page we give an overview of the most advanced features available in P4-Utils. In the following paragraphs, we will explore some programmatic ways to control the switch and to schedule tasks on the nodes of the network.
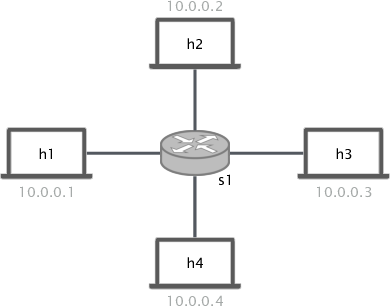
To get started, let us consider again the example already presented in the usage section.
Let us assume, that we already followed the instructions to create the network and we are
now able to start it. We need to configure the switch s1 to make it able to perform
L2 forwarding.
Important
For more examples and use cases, we recommend to check out the repository P4-Learning. It is a collections of working examples and exercises that are very helpful to start programming with P4.
Control Plane Configuration
In the following sections, we explore two alternatives to the Thrift command-line client method to control the switch.
Thrift API
The Thrift API can be used with every P4 switch and it is based on the code of the
Thrift command-line client. In fact, it provides the same methods to control the switch.
The implementation of the Thrift API relies on
SimpleSwitchThriftAPI.
To get started, we create a new Python script called controller.py and we import
the module needed to configure the P4 switch:
from p4utils.utils.sswitch_thrift_API import SimpleSwitchThriftAPI
We also need to esablish a connection with the server running on the switch. We know
that the Thrift server of s1 is listening on 127.0.0.1:9090 (see here), so we can
connect using:
controller = SimpleSwitchThriftAPI(9090)
Warning
SimpleSwitchThriftAPI assumes by default
that the IP address of the Thrift server is 127.0.0.1.
Now, we can use the controller to set up our forwarding rules. We can use the
method table_add():
controller.table_add('dmac', 'forward', ['00:00:0a:00:00:01'], ['1'])
controller.table_add('dmac', 'forward', ['00:00:0a:00:00:02'], ['2'])
controller.table_add('dmac', 'forward', ['00:00:0a:00:00:03'], ['3'])
controller.table_add('dmac', 'forward', ['00:00:0a:00:00:04'], ['4'])
Now, after the network starts, we can run the controller script to populate the
forwarding table of s1:
python3 controller.py
Important
This guide is just a quick overview of how to use the Thrift API. Please check
out the documentation of SimpleSwitchThriftAPI
and ThriftAPI to learn more advanced options.
P4Runtime API
The P4Runtime API is implemented by
SimpleSwitchP4RuntimeAPI and can
only be used with P4Runtime capable switches: not all the binaries provided by the
behavioral-model implement this feature. As a consequence, only
P4RuntimeSwitch supports P4Runtime, whereas
P4Switch does not.
For this reason, we provide a quick guide on how to enable P4Runtime in your network using the Python script or the JSON file.
Warning
The behavioral-model must be build with the P4Runtime dependencies in order to make it work. Otherwise, only non-P4Runtime targets will be available.
Assuming that we have correctly enabled P4Runtime, we can write our Python P4Runtime
controller (called controller.py) for the switch s1:
from p4utils.utils.sswitch_p4runtime_API import SimpleSwitchP4RuntimeAPI

controller = SimpleSwitchP4RuntimeAPI(device_id=1, grpc_port=9559,
                                      p4rt_path='l2_forwarding_p4rt.txt',
                                      json_path='l2_forwarding.json')
Important
Both the P4Info file l2_forwarding_p4rt.txt and the P4 compiled JSON file
l2_forwarding.json are generated by the P4 compiler. In order to enable the P4Info file
generation, please check the P4Runtime guides for Python and JSON.
Warning
- The
device_idcan be explicitly assigned to the switches in the network configuration. If thedevice_idis not specified for any switch in the network, then the alphabetic order is used for the assignment and the first switch will get1. - The
grpc_portcan be explicitly assigned to the P4Runtime switches in the network configuration. If thegrpc_portis not specified for any P4Runtime switch in the network, then the alphabetic order is used for the assignment and the first P4Runtime switch will get9559.
Now, we can use the controller to set up our forwarding rules. We can use the
method table_add():
controller.table_add('dmac', 'forward', ['00:00:0a:00:00:01'], ['1'])
controller.table_add('dmac', 'forward', ['00:00:0a:00:00:02'], ['2'])
controller.table_add('dmac', 'forward', ['00:00:0a:00:00:03'], ['3'])
controller.table_add('dmac', 'forward', ['00:00:0a:00:00:04'], ['4'])
Now, after the network starts, we can run the controller script to populate the
forwarding table of s1:
python3 controller.py
Important
This example is only a brief overview of the most common options available with
the P4Runtime API. Please check out the documentation of
SimpleSwitchP4RuntimeAPI
to learn more advanced methods.
Enabling P4Runtime with Python
Considering our simple example, the P4 compiler has to know that we are using a P4Runtime switch to generate the P4Info file needed to connect to the P4Runtime server of the switch.
net.setCompiler(p4rt=True)
Afterwards, we need also to specify that we are using P4Runtime switches. In the Python network configuration script, this can be done by writing:
net.addP4RuntimeSwtich('s1')
Enabling P4Runtime with JSON
For what concerns the JSON confinguration files, the P4 compiler can generate the P4Info if
one specifies it with the compiler_module option. Moreover, one can set the default
type of P4 switches with the switch_node option. In this way, we can make every switch a
P4RuntimeSwitch.
After having applied all the aforementioned settings to the JSON network configuration file of our simple example, it looks like this:
{
  "p4_src": "l2_forwarding.p4",
  "cli": true,
  "pcap_dump": true,
  "enable_log": true,
  "compiler_module":
  {
    "options":
    {
      "p4rt": true
    }
  },
  "switch_node":
  {
    "module_name": "p4utils.mininetlib.node",
    "object_name": "P4RuntimeSwitch"
  },
  "topology": {
    "assignment_strategy": "l2",
    "default": {
      "bw": 10
    },
    "links": [["h1", "s1"], ["h2", "s1"], ["h3", "s1"], ["h4", "s1"]],
    "hosts": {
      "h1": {
      },
      "h2": {
      }
      ,
      "h3": {
      }
      ,
      "h4": {
      }
    },
    "switches": {
      "s1": {
      }
    }
  }
}
Topology Database
Until now we have seen different methods to control the switch, but they always rely on the information that the user provides: the user has to know all the network addresses, the port numbers, etc. Although this is feasible with small topologies, it becomes harder with large ones, where you have to deal with tens or even hundreds of addresses and port numbers.
In order to overcome this issue, P4-Utils has a built-in topology database that is automatically
generated after the network starts and it is saved to a JSON file, usually called topology.json,
in the execution directory. One can then query this file to retrieve topology information.
This framework is implemented by NetworkGraph.
For example, let us consider our simple example. We can automatically configure the forwarding table without knowing anything about the switch:
from p4utils.utils.helper import load_topo
from p4utils.utils.sswitch_p4runtime_API import SimpleSwitchP4RuntimeAPI

topo = load_topo('topology.json')

controller = SimpleSwitchP4RuntimeAPI(topo['s1']['device_id'],
                                       topo['s1']['grpc_port'],
                                       p4rt_path=topo['s1']['p4rt_path'],
                                       json_path=topo['s1']['json_path'])

for neigh topo.get_neighbors('s1'):
    if topo.isHost(neigh):
        controller.table_add('dmac',
                             'forward',
                             [topo.get_host_mac(neigh)],
                             [str(topo.node_to_node_port_num('s1', neigh))])
Important
This guide is just a basic overview of how to use the topology database. Please check
out the documentation of NetworkGraph to
learn more advanced techniques involving also routers.
Task Scheduler
The Task Scheduler allows the user to simply schedule different tasks (e.g. generation of traffic) on different nodes. It can be accessed in two ways:
- one can add tasks from the network client,
- one can put the tasks in a
.txtfile (one per line) that is parsed by P4-Utils.
Here we provide only simple examples. To learn more about the capabilities of the task scheduler, you can check out the examples of the P4-Utils repository.
Scheduling tasks with the Network Client
After the network starts, we can use the following command in the network client:
mininet> task <node> <start> <duration> <exe> [<arg1>] ... [<argN>] [--mod <module>] [--<key1> <kwarg1>] ... [--<keyM> <kwargM>]
In particular, we have:
nodeis the node name,exeis the executable to run (either a shell string command or the name of a Python function),argXis a positional arguments for the passed function (optional),startis the task delay in seconds with respect to the current time,durationis the task duration time in seconds (if duration is lower than or equal to0, then the task has no time limitation),keyXandkwargXis a key-word arguments for the passed function (optional).
Important
The deafult module in which functions are looked up is p4utils.utils.traffic_utils.
A different module can be specified in the command with --mod <module>.
If we consider our simple example, to make h1 ping h2 for 10 seconds, we can type the
the following line in the client:
mininet> task h1 0 10 "ping 10.0.0.2"
Scheduling tasks with a file
When dealing with multiple tasks, it is handy to use a single file that collects them all instead of using the client. This file is parsed during the network boot and the tasks are distributed right after.
Warning
For task files, the start value is the delay with respect to the network starting time.
The syntax of this file is the same of the network client with only one
difference: you must not put the task command at the beginning of the task line. You also
have to put one task per line.
For example, let us consider the L2 forwarding example. We want the following tasks:
h1pingsh2for 10 seconds starting 30 seconds after the network boot.h3pingsh4for 30 seconds starting 10 seconds after the network boot.
We can write our file tasks.txt as follows:
h1 30 10 "ping 10.0.0.2"
h3 10 30 "ping 10.0.0.4"
Now, we need to pass the file to the P4-Utils framework. If you are using a Python network configuration script, you can add it using the following line:
net.addTaskFile('tasks.txt')
On the other hand, if you are using the JSON configuration file, you can add the following
key-value to the main dictionary (for example, you can place it after the p4_src option):
"tasks_file": "tasks.txt"
Now, you are ready. After the network starts, every task is automatically scheduled according to the information contained in the tasks file.